

How To Create Cucumber Project In Eclipse
Cucumber - Java Testing
To run Cucumber test with Java, following are the steps.
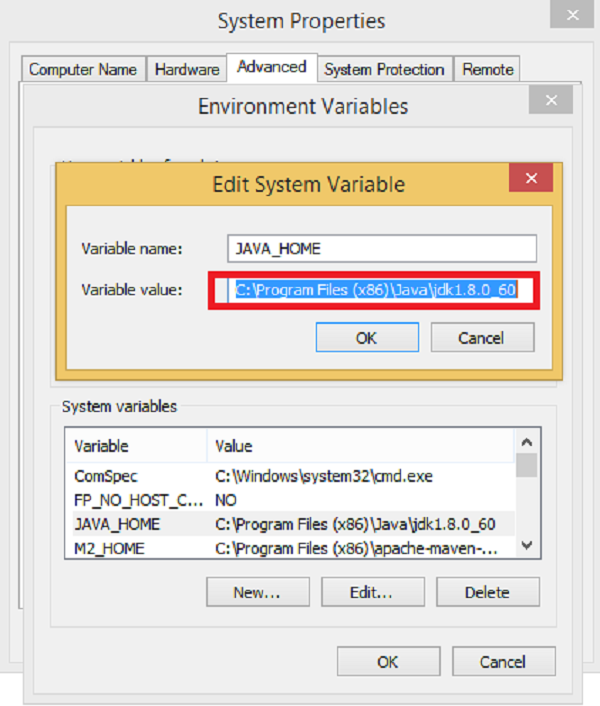
Step 1 − Install Java −
-
Download jdk and jre from
http://www.oracle.com/technetwork/java/javase/downloads/index.html
-
Accept license agreement.
-
Install JDK and JRE.
-
Set environment variable as shown in the following picture.
Step 2 − Install Eclipse IDE −
-
Make sure JAVA is installed on your machine.
-
Download Eclipse from https://eclipse.org/downloads/
-
Unzip and Eclipse installed.
Step 3 − Install Maven −
-
Download Maven −https://maven.apache.org/download.cgi
-
Unzip the file and remember the location.
-
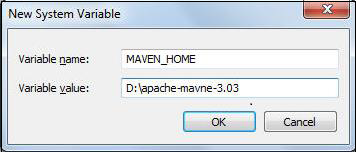
Create environment variable MAVEN_HOME as shown in the following image.
-
Edit Path variable and include Maven.
-
Download MAVEN plugin from Eclipse
-
Open Eclipse.
-
Got to Help → Eclipse Marketplace → Search maven → Maven Integration for Eclipse →INSTALL
-
Step 4 − Configure Cucumber with Maven.
-
Create a Maven project.
-
Go to File → New → Others → Maven → Maven Project → Next.
-
Provide group Id (group Id will identify your project uniquely across all projects).
-
Provide artifact Id (artifact Id is the name of the jar without version. You can choose any name which is in lowercase).
-
Click on Finish.
-

Step 5 − Open pom.xml −
-
Go to the package explorer on the left hand side of Eclipse.
-
Expand the project CucumberTest.
-
Locate pom.xml file.
-
Right-click and select the option, Open with "Text Editor".
Step 6 − Add dependency for Selenium − This will indicate Maven, which Selenium jar files are to be downloaded from the central repository to the local repository.
-
Open pom.xml is in edit mode, create dependencies tag (<dependencies></dependencies>), inside the project tag.
-
Inside the dependencies tag, create dependency tag. (<dependency></dependency>)
-
Provide the following information within the dependency tag.
<dependency> <groupId>org.seleniumhq.selenium</groupId> <artifactId>selenium-java</artifactId> <version>2.47.1</version> </dependency>
Step 7 − Add dependency for Cucumber-Java − This will indicate Maven, which Cucumber files are to be downloaded from the central repository to the local repository.
-
Create one more dependency tag.
-
Provide following information within the dependency tag.
<dependency> <groupId>info.cukes</groupId> <artifactId>cucumber-java</artifactId> <version>1.0.2</version> <scope>test</scope> </dependency>
Step 8 − Add dependency for Cucumber-JUnit − This will indicate Maven, which Cucumber JUnit files are to be downloaded from the central repository to the local repository.
-
Create one more dependency tag.
-
Provide the following information within the dependency tag.
<dependency> <groupId>info.cukes</groupId> <artifactId>cucumber-junit</artifactId> <version>1.0.2</version> <scope>test</scope> </dependency>
Step 9− Add dependency for JUnit − This will indicate Maven, which JUnit files are to be downloaded from the central repository to the local repository.
-
Create one more dependency tag.
-
Provide the following information within the dependency tag.
<dependency> <groupId>junit</groupId> <artifactId>junit</artifactId> <version>4.10</version> <scope>test</scope> </dependency>
Step 10 − Verify binaries.
-
Once pom.xml is edited successfully, save it.
-
Go to Project → Clean − It will take a few minutes.
-
You will be able to see a Maven repository.
Step 11 − Create a package under src/test/java named as cucumberJava.
Step 12 − Create feature file
-
Select and right-click on the package outline.
-
Click on 'New' file.
-
Give the file a name such as cucumberJava.feature.
-
Write the following text within the file and save it.
Feature: CucumberJava
Scenario: Login functionality exists
Given I have open the browser
When I open Facebook website
Then Login button should exits
Step 13 − Create step definition file −
-
Select and right-click on the package outline.
-
Click on 'New' file.
-
Give the file name a name such as annotation.java.
-
Write the following text within the file and save it.
package CucumberJava; import org.openqa.selenium.By; import org.openqa.selenium.WebDriver; import org.openqa.selenium.firefox.FirefoxDriver; import cucumber.annotation.en.Given; import cucumber.annotation.en.Then; import cucumber.annotation.en.When; public class cucumberJava { WebDriver driver = null; @Given("^I have open the browser$") public void openBrowser() { driver = new FirefoxDriver(); } @When("^I open Facebook website$") public void goToFacebook() { driver.navigate().to("https://www.facebook.com/"); } @Then("^Login button should exits$") public void loginButton() { if(driver.findElement(By.id("u_0_v")).isEnabled()) { System.out.println("Test 1 Pass"); } else { System.out.println("Test 1 Fail"); } driver.close(); } } Step 14 − Create a runner class file.
-
Select and right-click on the package outline.
-
Click on 'New' file.
-
Give the file name as runTest.java.
-
Write the following text within the file and save it.
package cucumberJava; import org.junit.runner.RunWith; import cucumber.junit.Cucumber; @RunWith(Cucumber.class) @Cucumber.Options(format = {"pretty", "html:target/cucumber"}) public class runTest { } Step 15 − Run the test using option −
-
Select runTest.java file from the package explorer.
-
Right-click and select the option, Run as.
-
Select JUnit test.
You will observe the following things upon execution −
-
An instance of Firefox web browser will open.
-
It will open the Facebook login page on the browser.
-
It will detect the login button.
-
The browser will close.
-
In the JUnit window, you will see a scenario with green tick mark, which indicates success of the test execution.
How To Create Cucumber Project In Eclipse
Source: https://www.tutorialspoint.com/cucumber/cucumber_java_testing.htm
Posted by: berryhalseara.blogspot.com
0 Response to "How To Create Cucumber Project In Eclipse"
Post a Comment